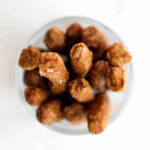
Crunchy, toasty brown, and with the perfect sweet + salty balance, this Vegan Gluten-Free Homemade Pretzel Sticks recipe is ideal for snacking or dipping!
 Pretzels do not appreciate being overcrowded. That is the morale of this
 story recipe.
My thinking was “Hey soft pretzels are really tricky, let’s give the crunchy ones a try instead!” You have to imagine me saying that in a hopeful, optimistic, this-must-be-possible voice. The optimism lasted all the way through the kneading and the rolling and the twisting and the first 2/3 of the baking. And then it faded. Fast.
The crunchy part of the crunchy pretzel sticks was missing. There was no crunch. But then they cooled, and the crunch returned. Well sort of. They were crunchier than before, but still nowhere near Snyder’s level of snappy. But snappy enough to pretzel persevere on to trial number 2.
With a few ingredient tweaks and cook time changes, trial number 2 was snappy! Very snappy. If you love your teeth stay away kinda snappy. So now the challenge was finding the balance between chewy and dental emergency.

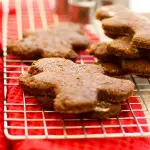
Trial number 3 was not the perfect balancing act I was hoping for–too soft again. But it wasn’t ingredients or cook time or temperature that was the problem, it was the pan arrangement. With four dozen pretzels on one pan, none of them got the proper heat necessary to become perfect pretzels. They needed more space to stretch out, express themselves, find their own happiness. Wait…are we still talking about pretzels?
Well as long as we agree “happiness” = crunchiness and “express themselves” = perfect golden brown edges, it still makes sense.
So for trial number 4 I didn’t change a single ingredient. All I did was use 2 pans instead of one and play with the oven temperature a little bit. And wow what a difference it made!
Finally the ideal crunchy pretzel stick. Crispy, toasty brown, and with the perfect snap! Plus a lovely balance of salty and sweet flavors–that’s my favorite part.

Vegan Gluten-Free Pretzel Sticks Recipe
So now that you’ve heard the entire pretzel saga, let’s talk specifics of this pretzel sticks recipe…
Flours. These pretzels are made with my favorite flour combo: oat + tapioca. As long as you use certified gluten-free oats, they are totally gluten-free. And with the help of tapioca flour the dough is still incredibly soft and pliable, which is essential for pretzel twisting. Oh and it’s oil/fat free too!
Yes the tapioca flour is necessary. No I do not know if _______ flour will work instead. This is what I have tested and know to work. Just saying.
Yeast-Free. This pretzel sticks recipe is completely yeast free, relying on baking powder as the leavening agent. I know some people prefer yeast free recipes for dietary reasons, but I really love them mostly because they are faster. No waiting around on microscopic organisms to do their part. Just knead, roll, boil, brush, and bake!

“Egg” wash. To make the outsides extra toasty brown, most hard pretzel recipes use an egg wash. With a little research, I found a vegan alternative that not only makes for lovely browning but also adds to the flavor. It is made by whisking maple syrup and non-dairy milk together and then brushing that on the pretzels after boiling them in the baking soda solution. That layer of sweetness combined with the salty sprinkle on top is so delicious.
Baking. After lots of experimentation with oven time and temperature, I have found a slightly lower temp for a longer time to work best. Otherwise the outside cooks faster than the inside. However, a bit of high heat initially makes them crisper in the end, so preheat the oven to 400F and then reduce to 325F when you put the pretzels in.
As for the baking time, 50-55 minutes will yield a crunchy pretzel that keeps it’s crunch even days later. Less time than that and the inside will still be slightly chewy. Personally I don’t mind that–like a soft pretzel but in miniature. Also, the twists take longer to cook than the sticks, so at 50-55 minutes the twists may not be as crunchy as the sticks. And remember every oven is different so it might take some experimentation with your oven.
Okay, that’s all the pointers I can think of for now. I hope you enjoy these salt-sprinkled snappy snack sticks!
>>> Click Below To Pin <<<

Gluten-Free Pretzel Sticks Recipe
- Prep Time: 30 minutes
- Cook Time: 45 minutes
- Total Time: 75 minutes
- Yield: 4 dozen 1x
Ingredients
- 3/4 cup oat flour
- 1/2 cup tapioca flour (also known as tapioca starch)
- 1 tsp baking powder
- 1 tbsp coconut sugar (optional)
- 1/2 tsp salt
- 2/3 cup boiling water
- 3 tbsps baking soda (for boiling)
“Egg” Wash
- 2 tbsp non-dairy milk
- 1 tbsp maple syrup
- Coarse salt for sprinkling on top
Instructions
- Combine the flours, baking powder, coconut sugar, and salt. Stir.
- Add the boiling water. Mix/knead to form a cohesive dough. It should not be sticky, if it is add a little extra tapioca flour.
- Divide the dough into smaller balls and roll out into thin ropes. Cut into sticks or twist into mini pretzel shapes. The dough will dry out as it sits, dampen your hands and proceed rolling to re-moisten it.
- Fill a large, shallow pan with water. Add the baking soda. Bring to a boil.
- Once boiling, add some of the pretzels. Do not overcrowd them, I did it in about 6 batches.
- Boil for 30 seconds. Use a slotted spoon to remove from the water and spread onto 2 or 3 baking pans lined with parchment paper. DO NOT overcrowd them.
- Continue until all pretzels have been boiled.
- Preheat the oven to 400F.
- Mix together your egg wash. Brush a thin layer on all the pretzels.
- Top with coarse salt.
- Place the pans in the oven and reduce the temperature to 325F. Bake for 50-55 mins.
- Remove from the oven and let them cool for at least 15 mins before removing from the pan and eating.
- They are best fresh. Keep in an airtight container, but they may soften with time.


These look so awesome! I love your description of your recipe testing on this one. Too funny.
Ha it has been a long pretzel filled road (and weekend :D) Thanks Becky!
Oh my goodness. You make the impossible possible. I think all your efforts recipe testing have paid off here! I want to eat one straight from the screen…
I certainly hope so! And I certainly hope I don’t have to roll out another pretzel for at least a month lol 😀
These look so good! I hate yeast recipes because i have ZERO patience and these look perfect for me. Do you think all purpose flour or whole wheat flour would be fine in place of the oat flour?
Haha I know right, they take so long! Especially when you have to keep testing the recipe over and over again–nowhere near enough patience for that. Yes, AP or whole wheat should be fine in place of both the oat and tapioca?
Always keep your optimism, that’s what I love best about you!! 🙂 Such a sneak peek with the overcrowding! I was on that rollercoaster with you as the trials went by: slightly snappy, but no crunch… then snap-your-teeth-off-snappy, then the existential crisis pretzels. Happiness and express themselves so mean what you said that mean. Um, where was I? I love that you cracked this recipe (and not a tooth) simply by giving these little guys more room to breathe. Ah… the symbolism. Haha. And lol on ____ flour being a complete question mark. Can’t wait to see, well HOPING that you do something Halloween-ish with these! Pretty please?? And your sprinkles too. Don’t forget! 🙂
We were both in the especially narrative mood today! Although there was no such obvious foreshadowing in yours. It was suspense and surprise the whole way through–I was panicking and running right along with ya? Well figuratively of course…remember I don’t really run lol? All the teeth made it through alive fortunately, it was a big touch and go there for a while. But always worth it, right?? Oh I know, the pretzel-life metaphor was deep right! Deep followed by the somewhat sassy don’t-ask-me-about-every-flour-substituion part? I cannot get the image of orange and black spring coated pretzels out of my head now, so don’t you worry it will happen! xo
I have ALWAYS wanted to make my own pretzels. LOVE LOVE LOVE LOVE LOVE. And oat flour? So bae. It’s quick;y becoming my fave flour to work with!!! Thanks to YOU.
Oat flour is the best right!? I was afraid it wouldn’t work for something so crunchy since it tends to be best suited to chewy ventures, but with enough bake time it they still got that crunch 🙂
Crunchy little beauties! So impressed by this recipe! When I watched the video I thought “this couldn’t have been an easy one to get right” and it seems like that’s very true haha, but you did it! Amazing!
You hit the nail on the head with that assumption, I’ve been pretzeling all weekend over here haha 😀 Thanks Leah!
Hahaha dental emergency, you crack me up girl! Oh these are great!! I can almost taste that salty and sweet combination… Mmmmm! I definitely need to try these, even though I know my daughter would immediately try to take off with the entire batch! I’ve had soft pretzels on my list of recipe ideas for awhile, but never have I thought to make crunchy ones! As soon as I get some more tapioca starch… These will be made!
I’ve been dreaming of a perfect vegan gf soft pretzel recipe for a while too, so if you figure that out please do let me know so I can make them IMMEDIATELY! But for now these crunchy ones are satisfying the salty-sweet bread void perfectly 🙂
Haha, that was one funny story Natalie!! These look sooo much better than Snyder’s and more flavorful, too. I find theirs a bit on the bland side. And it sounds like your pretzel story is exactly how it has been in my kitchen lately, trial after trial and failures, ugh! So much pumpkin already and the season hasn’t even really started yet, lol!
I love the simplicity of the recipe and you already know how much I love oat flour and tapioca! I agree with you on that. My favorite flours for several years now. And hahaha on the ______ flour, I know, right? The million questions that come about flours when they ALL behave differently. I bet these would be so darn delicious dipped into some mustard, yum! They are just too cute and so perfect!
By the way, I’m signed up for your emails but I don’t get them when you publish a new post 🙁
Recipes that require countless kitchen trials are simultaneously exiting and sooooo draining. After a recipe that takes 5+ tries to get right I’m always ready for something no-bake or like a mug cake, something easy and surefire lol. Well I am very very very much looking forward to when you do start to release all the pumpkin goodness (that cookie cake?) I need to put that disclaimer on every single recipe but, the questions about flour substitutions are endless on bread-like recipes as I’m sure you know very well. Tapioca is such an amazing flour, nothing quite replaces it for me. Oooh mustard, I didn’t even think of that one. My mind had already gone in the peanut butter chocolate direction 😀 Oh and I do a weekly newsletter (usually on the weekend) as opposed to with each post. I switched a while ago because they were going to spam when I had them set up to do it automatically.
seriously NEVER knew it was possible to make GF and vegan pretzel sticks out of oat flour!! Natalie you are a GENIUS! These take me back to my elementary days when I used to dip pretzels sticks in peanut butter!
I wasn’t sure the oat flour part was possible either, so that was a happy surprise! Ha me too–so many cafeteria, sticky table, lunchbox memories 😀
Your trials had me in tears! Haha!! But you nailed it!! Crazy what a minor adjustment will do. And I love that you made them into twists AND sticks – looks like you’ve become a bit of a pro! I really enjoyed the video, as usual ? It’s been ages since I’ve had pretzels…darn soy! But these look so perfect! I how about that “egg” wash though?!? Never would have thought to use those ingredients – I’m really anxious to make these for my family ❤️
I’m pretty sure I could roll pretzels in my sleep at this point, twists or sticks 😀 By the last few trials I would get through rolling half the batch and just say eh that’s enough to test lol. Ugh I know, there are no good clean GF pretzels out there and the Mary’s ones which are the closest have that dang tamari. I’m pretty sure Cara from Fork and Beans has one with almond flour though, so other flours besides oat could definitely be worth experimenting with. And the egg wash is one of my favorite discoveries of the whole process! I read it on some forum somewhere and it really does help with the browning. Thank you for stopping by lovely <3
By tapioca flour do you mean tapioca starch? Or is there a difference between the two?
They are the same thing 🙂
Oh Natalie this recipe is so amazing. I have to try them. Can’t believe that I still don’t have tapioca in my kitchen. It’s so hard to find it here and I’m always using potato or corn starch instead. Hope I can do them before going to California but I think that’s a bit utopical.
Have a wonderful weekend.
<3
Hi Annelina, always fun to hear from you! Oh how I wish tapioca was more widely available, it’s amazing stuff. I think that corn or potato could work in these too though, haven’t tried it out yet. You are going to CA!?! For fun? That’s amazing have the best time and enjoy all the awesome vegan food 🙂 xx
aw always love talking to you me friend! Yes I’m wishing this too. Can’t wait to bake something with Tapioca.
Yes I’ll go there just for fun :). Before starting to work. Thank you so much.
I heard the vegan food is amazing overthere.
Loads of love and wishing you a wonderful time too!
For some reason mine came out bitter!! Idk what happened?! ):
They are supposed to have that slightly metallic pretzel taste, that’s what the baking soda bath is for. If they were too bitter, try using less baking soda when boiling them next time.
I just made these and they were great. I didn’t have the coconut sugar because I didn’t have any and they were salty, like a regular pretzel. If I added the coconut sugar or maybe honey, does that make them sweeter like a honey pretzel?
★★★★★
SO happy you liked them Marlene! Yes the coconut sugar just adds a very subtle sweetness to balance the salt, honey would work as well 🙂
I made these yesterday, and they are so delicious. They taste like sourdough pretzels and they are so good!
★★★★★
Woohoo!! They do kinda have that vibe, don’t they. So happy to hear you liked them Sam 🙂
I made these and they were a hit!
Do you think the recipe could be adapted to make bagels? Of course, I wouldn’t want the bagels crunchy. This idea might not work, I suppose, because bagels are so much thicker…? I like the flour combination and how easy it was to handle the dough compared to other gluten free recipes, so it made me wonder if something similar could be done to make bagels.
I like the humorous way you wrote the post!
Thank you so much!
★★★★★
Yes!! I am so happy you liked them 🙂 I have actually had the same thought of adapting this to bagels or even soft pretzels but haven’t tested it. GF breads are not my strong suit, but I do think this dough has potential. If you want to give it a shot just make the dough the same way, shape them into bagels/pretzels, boil them, and then only bake for about 15-20 minutes. My only concern is that the inside might turn out gummy, but I will give it a try sometime soon myself! Thanks for the feedback Hannah 🙂
Thank you for the ideas! I think I will try it. If you make the dough into soft pretzels or bagels, please let me know how it turns out!
Also, I did not get 4 dozen pretzel sticks out of this recipe… I guess maybe I made mine bigger? I think I got about 20.
These look fab! Glad you found the perfect balance without destroying your teeth. I bet they found their happiness in the end 🙂
Haha yes teeth remaining intact is always important 😀 Thanks Michael!
Looks great. Can wait to try! In terms of feedback, it might make sense to rearrange the steps to start boiling water and preheating the oven earlier than they are now so you’re not sitting with rolled pretzels waiting for boiling water or boiled pretzels waiting for the oven to heat up. ^_^
Good thought! Thanks for the feedback 🙂
Not very good. Got super hard baking for the for 50 mins. Checked prior and they were still weird and chewy.
★★
Sorry they didn’t work out for you😕
I just made these and love the taste and texture. But I had a problem with all of them sticking to the parchment paper, so have to try again. Is there a step I’m missing? I didn’t see anything saying to spray or coat the parchment. I did substitute 1 tbl honey for the 1 tbl coconut sugar.
It could be the honey that made it stick! You can definitely try spraying the parchment next time👌
hi friend!! this recipe looks amazing, can’t wait to try it! my only question- do you think if i dipped them in chocolate they would still be crunchy?? my little brother can’t have dairy, wheat, eggs or yeast (which makes him really hard to cook for, lol!) and he was telling me how much he misses chocolate covered pretzels!
Yes, they should be absolutely fine dipped in chocolate and still maintain their crunch! As long as you don’t add any milk or anything else to the melted chocolate, you’re good to go😊 I hope your brother LOVES them!