These homemade dye-free sprinkles are made from unsweetened shredded coconut and colored completely naturally — pink from raspberries, purple from blueberries, yellow from turmeric, and green from spirulina. No refined sugar, no artificial food dyes, no hard-to-find ingredients. Just 20 minutes of prep and a handful of pantry staples. Perfect for birthday cakes, smash cakes, frosted cookies, yogurt bowls, and anywhere you want a pop of color without the junk. Vegan, gluten-free, and paleo-friendly.

Table of contents
If you’ve ever flipped over a bottle of store-bought sprinkles and squinted at the ingredient list, you know the drill — sugar, corn syrup, artificial dyes Red 40, Blue 1, Yellow 5. Even the “natural” brands are usually just overpriced sugar with a cleaner label. These homemade dye-free sprinkles are something else entirely.
Made from unsweetened shredded coconut and colored with fruit juice and plant powders, they’re completely free of artificial dyes, refined sugar, and anything you can’t pronounce. Pink from raspberries. Purple from blueberries. Yellow from turmeric. Green from spirulina. (And un-pictured options for orange and blue too!) And they take about 10 minutes of hands-on time to make, and no baking required.
They won’t taste like traditional sprinkles — there’s no sweetness, just a subtle hint of coconut — but on top of a frosted cake or a bowl of nice cream, the effect is exactly the same: a confetti-bright pop of color that makes everything feel like a celebration.

Why make your own dye-free sprinkles?
Most store-bought sprinkles, even the ones marketed as “natural”, are still mostly sugar with artificial dyes making up the color. Flip over a bottle and you’ll find Red 40, Blue 1, Yellow 5, and a handful of other ingredients that have nothing to do with real food. The natural brands are a step up, colored with natural sources instead of food dyes, but they are often $8 for a tiny jar and sugar is usually still the first ingredient.
These homemade dye-free sprinkles sidestep all of that. The base is just unsweetened shredded coconut (naturally the perfect shape and size for a sprinkle!) colored with ingredients you can actually name: raspberry juice, blueberry juice, turmeric, spirulina. No sugar, no wax, no mystery stabilizers. And because you’re making them yourself, you control exactly which colors you make and how much of each. They’re also genuinely fun to make, especially with kids. Consider that a bonus!
Ingredients
You only need a handful of simple ingredients to make a full rainbow batch of dye-free sprinkles. The base is always unsweetened shredded coconut, but the colorants change depending on which color(s) you’re making.
- The base: unsweetened shredded coconut (one ¼ cup portion per color)
- The colors:
- Pink: frozen raspberries (or pitaya/dragon fruit puree for a deeper pink)
- Purple: frozen blueberries
- Yellow: ground turmeric + water
- Green: spirulina powder + water
A few notes on sourcing: spirulina is the ingredient most likely to require a trip to a health food store or a quick online order. Everything else (frozen berries, turmeric, shredded coconut) is easy to find at any supermarket. The coconut should be unsweetened and finely shredded, not the thick flake variety, so it mimics the size and shape of jimmies style sprinkles.

Natural Color Guide
This is the most fun part of the whole process and the most flexible. Each color comes from a different plant-based source, and the intensity can be adjusted just by adding a little more colorant. Here’s a breakdown of what makes each shade:
- Pink — raspberry juice or pitaya powder. Raspberry gives a bright, warm pink. Pitaya (dragon fruit) powder pushes it more magenta. Either works beautifully.
- Purple — blueberry juice. Fresh or frozen both work, blackberries would work too and also create a gorgeous shade of purple
- Yellow — turmeric. Just a pinch goes a long way. Start small, turmeric is potent and can start to affect the flavor if you use too much.
- Green — spirulina powder. Earthy in flavor but the color payoff is excellent. Again, a little goes a long way so start small. Matcha powder would also work.
- Blue — blue spirulina. This one is worth tracking down if you want a true blue. It’s flavorless and the color is stunning.
- Orange — carrot juice. Fresh or bottled works, or you could try combining a bit of raspberry juice and turmeric.
Always start with less colorant than you think you need and add more gradually. The color deepens as you mix and intensifies as the coconut dries out too.
How to make dye-free sprinkles?
This is a simple process, no special equipment, no candy thermometer, no piping bags. Just coconut, color, and a little patience while they dry.
Step 1: Prepare your colorants. For fruit-based colors (pink and purple), blend a small handful of frozen raspberries or blueberries and strain through a fine mesh sieve to get a concentrated juice. You only need about 1 tablespoon per color. For powder-based colors (turmeric, spirulina, blue spirulina), mix ¼ teaspoon of powder with 1 teaspoon of water to form a thin paste.
Step 2: Color the coconut. Add ¼ cup of unsweetened shredded coconut to a small bowl. Add your colorant one teaspoon at a time, tossing well between additions until the coconut is evenly coated and you’re happy with the color.
Step 3: Spread and dry. Spread each color in a single layer on a paper towel-lined baking sheet, keeping the colors separate. Let them dry completely for 24 hours at room temperature or in the refrigerator. This is the most important step, rushing it leads to colors bleeding or clumping.
Step 4: Store and combine. Once fully dry, transfer each color to its own small airtight container or zip-lock bag. Store them separately and mix just before using. This keeps the colors crisp and prevents bleeding over time. When you’re ready to decorate, combine as many or as few colors as you like.

How To Use The Sprinkles
Dye-free sprinkles work anywhere you’d use traditional sprinkles, the main difference is the coconut base which adds a very subtle texture and flavor rather than pure sweetness. Here are some of the best ways to use them:
- Cakes and cupcakes — press gently into frosting right before serving for the best color payoff, these work especially well on white or light-colored frosting.
- Smash cakes — this is actually one of the most popular reasons people make these. If you’re making a first birthday cake (my own baby’s first birthday cake is pictured above, THIS is the refined sugar free vanilla cake recipe I used) and want something colorful that’s free of artificial dyes and sugar, these are perfect.
- Cookies — sprinkle over a frosted or glazed sugar cookie. The colors hold well on dry surfaces.
- Yogurt and smoothie bowls — a small handful scattered over a bowl adds color and a little texture without overpowering the other toppings. And makes a healthy snack more fun for little spoons.
- Nice cream and ice cream — one of my favorite uses. The contrast of colorful coconut sprinkles against a pale vanilla or banana base is beautiful.
One thing to keep in mind: these sprinkles can bleed slightly if they sit on a wet or very moist surface for too long, so for the best results add them just before serving.
Storage
Once fully dry, store each color in a separate airtight container at room temperature or in the refrigerator. A small glass jar works perfectly. Kept dry and away from humidity, they’ll last for up to 1 week at room temperature or 2-3 weeks in the fridge.
Avoid storing them in a warm or humid spot, moisture is the enemy here and will cause the coconut to clump and the colors to bleed. If you live somewhere humid, the fridge is the safer bet.
Combine the colors just before using for the crispest, most vibrant result.
Recipe FAQs
Yes! The only ingredient is unsweetened shredded coconut, colored with fruit juices and plant-based powders. No dairy, no eggs, no animal-derived ingredients.
Yes, all of the ingredients are naturally gluten-free. Just make sure your shredded coconut is certified gluten-free if you’re baking for someone with celiac disease.
The base is unsweetened shredded coconut, so yes there is a subtle coconut flavor. It’s mild enough that most people don’t notice it once they’re on top of a frosted cake or mixed into a bowl.
I’ve only personally tested the air-dry method, so I can’t speak to exact times or temps for other methods, but they may work in a dehydrator or oven on it’s lowest temperature. The risk is accidentally toasting the coconut, which would mess with the vibrance of the colors.
They weren’t fully dry before storing. Make sure they’re COMPLETLEY dry to the touch before transferring to a container. Spreading them out in a single layer and giving them plenty of time is the key.
Yes, fresh fruit works fine. Frozen fruit is convenient and tends to release more juice so that’s what I recommend.
They can last 2-3 weeks if stored in the fridge in separate airtight containers, so make a big batch and keep them on hand for whenever you need a little color.

Recipes To Top With Dye-Free Sprinkles
- Dairy-Free Cake Batter Ninja Creami Protein Ice Cream — the funfetti vibes here are unreal with a handful of rainbow coconut sprinkles mixed in
- The Best Healthy Chocolate Cupcakes — a dark chocolate base is the perfect contrast for bright, colorful sprinkles on top
- Vegan Paleo Vanilla Cupcakes — a classic vanilla canvas that lets the colors really shine
- Vegan Cutout Sugar Cookies — press them into the frosting before it sets for the prettiest decorated cookies
- Baked Chocolate Sprinkle Donuts — swap the store-bought sprinkles for these and make them fully dye-free
If you try these Dye-Free Sprinkles, let me know what you think by leaving a comment or rating below! Be sure to follow along on Pinterest, Instagram, and Facebook for even more yummy recipes!
Print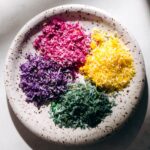
Dye-Free Sprinkles (Homemade Coconut Recipe)
- Prep Time: 10 minutes
- Drying Time: 24 hours
- Total Time: 24 hours 10 minutes
- Yield: 1/4 cup 1x
- Category: toppings
- Method: no-bake
- Cuisine: american
- Diet: Vegan
Description
Make your own dye-free sprinkles from shredded coconut, naturally colored with fruit and plant powders. No sugar, no artificial dyes — just pure rainbow fun!
Ingredients
Pink
- 1/4 cup frozen raspberries (or for an even brighter pink, pitaya puree)
- 1/4 cup unsweetened shredded coconut
Purple
- 1/4 cup frozen blueberries
- 1/4 cup unsweetened shredded coconut
Yellow
- 1/2 tsp ground ground turmeric
- 1 tsp water
- 1/4 cup unsweetened shredded coconut
Green
- 1/4 tsp spirulina powder
- 1 tsp water
- 1/4 cup unsweetened shredded coconut
Instructions
For the pink and purple:
- Microwave the berries to defrost.
- Press through a sieve extract just the juice.
- Add 1 tbsp of juice to the coconut, and stir to coat.
- Spread on a paper towel-lined plate.
For the yellow and green:
- Mix the spirulina/turmeric with the water.
- Add the coconut, and stir to coat.
- Spread on a paper towel-lined plate.
To dry out:
- Leave uncovered in the fridge or on the counter for 24 hours until COMPLETELY dry to the touch.
- Transfer to an airtight container in the refrigerator. Use within 1 week.
Notes
For blue: use blue spirulina powder and follow the same process as green/yellow.
For orange: use 1 tbsp carrot juice and follow the process of pink/purple.
Keywords: cake, birthday, funfetti, vegan, no sugar, dye free, homemade, coconut, blue, organic, purple, pink, green, yellow, healthy, smash cake


Haha, need to trick my dad into switching to these sprinkles 😉 He has such a sweet tooth, but could really do with cutting on sugar 🙂
Haha good luck with that one! Hey maybe if he likes coconut he will like these even better 🙂
What a perfect idea! Plus, I love coconut, so this is like two great things in one . . . or maybe many depending on how many different colours I make!
The subtle coconut flavor is like an extra bonus! Lol it could be a rainbow of great things in one 😀
This is a genius idea, Natalie! I’m always missing the fetti, too! I hate all the junk that’s in store-bought sprinkles. I have these on my list! They look beautiful!
★★★★★
Thanks Melissa! I know right, even the healthy-ish sprinkle brands are still really just overpriced sugar lol. And if you like coconut then these actually taste better too 🙂
Oh these are too cute! Love this idea of homemade sprinkles <3
Thanks Rachel 🙂
Oh, my goodness!!! What a fun and genius idea! Never crossed my mind to turn coconut shreds into delightful little sprinkles!! Love this so much. And I love the ingredients you chose for coloring the coconut!! Hahaha! They were my least favorite ice cream topping, too…I was all about the chocolate or caramel sauce…or cookie crumbles. Now I want a bowl of ice cream with all the toppings! And these sprinkles! Can’t wait to see this cake recipe <3
Now I need a pretty pink cake like Willow’s b-day cake to put them on, they would be perfect! As for ice cream toppings, I would still go for the chocolate chips or cookie pieces for flavor, but sprinkles are a classic for the sundae look…so both, all of the above, pile on the toppings 🙂 I’m actually out of frozen bananas right now, so just the thought of that topping-loaded nicecream bowl is very very tempting lol! Thanks Mandy <33
Oh my gosh this is absolutely gorgeous!! And genius!! You said “rainbows” would be coming and I’ve been wondering what it might be… But I didn’t expect this! So beautiful!
Lol that rainbow teaser was quite an odd cliffhanger wasn’t it 😀 Well it’s almost a rainbow anyways, we just need some blue! I still need to try the red cabbage trick. Thanks Laurina <3
This is so clever, and they came out beautifully!
Thanks Becky! I was afraid they would be dull after baking, but they did stay nice and bright 🙂
Ok, I’m feeling totally excited…. first Harriet’s homemade rainbow coconut sprinkles and now yours, it’s like a big celebration of sprinkles everywhere, hahaha! These are so pretty Natalie! I loved that you both did different flavorings! I must admit, although I know they aren’t healthy, I love classic sprinkles because they are crunchy and sweet and look so beautiful in baking. I hardly ever use them, maybe once a year, if even that?? So, I don’t stress over the fake colors when it’s so rare, in fact, I literally JUST received a giant tub of sprinkles last week from this girl I found on Etsy who makes the most beautiful sprinkles I’ve ever seen and are vegan! I made a Funfetti cake using them and when I post the recipe, I will totally link to your blog for these as an option for those who don’t want to use the traditional kind! I imagine these are much less sweet, but still super delicious! Love them girl!
That’s so neat, I never thought to check Etsy for those sorts of things! I definitely don’t stress over that stuff either, it’s just fun see what can be done without food coloring. Nope these aren’t sweet at all, just there for color. I was never a sprinkle fan though, so I guess I don’t miss it. There does seem to be a party theme going on. When I saw Harriet’s I was like OMG we are totally in sync with the birthday vibe! I can’t wait to see your cake, funfetti just makes me happy and excited too 🙂
Oh, I love yours, they are gorgeous!! It’s a great idea and super awesome way to avoid the food coloring and make something so pretty. I bet these would look awesome on your nice creams!!
These are the cutest 🙂 🙂 🙂 🙂 I’ve only ever tried pink ones, but now I MUST HAVE ALL THE RAINBOW COLORS!!!!! I really love the pics, you make these tiny sprinkles look like funfetti super models. And of course I really love the healthiness factor here – no added sugar. Will definitely try these!! And will definitely sprinkle them on every food we eat. Kids will love me and nominate me the best cook ever, I’m sure 😉
★★★★★
“Fufetti super models” LOL That’s exactly what I was going for, I’m so glad it came through 😀 You are so funny, I always love your comments! Well it seems I have a special love for the pink kind as well, seeing as I already made another batch–all pink this time. Certain recipes just call for all pink toppings. And some look better with a rainbow on top 🙂 Let me know when you get the nomination so I can vote for you, because I certainly think you deserve that award!
You are a genius, Natalie!!! I am in love with these. Will DEFINITELY be trying this!
Yay! They would look so cute on top of your fabulous cakes and cupcakes 🙂
Oh my goodness, Natalie. Wow! Just wow. I love this recipe + recipe idea so much, I don’t even know where to start! Everything about it is awesome–vegan, homemade, naturally dyed. Um… and the best part: FUN. The different colors of sprinkles are so unbelievably pretty. Plus, my constant yearning for homemade goodness has pretty much gone into overdrive here. Just sayin’. The video: lastly (then I promise to stop gushing like a dork), I just about swooned when you synced up the beats to the graphics. Oh my! The part of me that just LOVES Adobe Premiere just got all goofy seeing that! Okay, I’m done… I know where the door is. 😉
★★★★★
Hahaha you crack me up! Speaking of Adobe Premiere, I really need to learn that program and upgrade from iMovie. Anyways, yes yes yes–everything homemade! Half the fun is making it, and then getting to eat the products of your labor is like the icing on the cake (pun sort of intended :D) Thanks for stopping by Demeter!
So pretty. I think you definitely brought the “fetti” to the party 🙂 I’ve seen some colored shredded coconut DIY-type things before, but this is a whole new level of pretty — all my favorite colors, all natural. You are brilliant. And so is your funfetti! <3
I really should’ve planned this around a birthday or something, it would’ve been so fun to throw up in the air and let rain down mouth open wide 🙂 Yes I’ve seen it done before with food coloring too, but the all natural colors challenge was fun. I have to say after being mixed in the jar for a while turmeric definitely wins. They all have a slight yellow hue now, especially poor purple lol!
Haha! I didn’t think about that. But yes, turmeric is rather “sticky” … I was making some experimental cookies with some the other day and I couldn’t get the yellow from under my nails for days ?
This is SO cool! I was actually looking for vegan sprinkles the other day for a sponge cake recipe I had in mind, but I was put off by all the additives in them! These would be a perfect alternative! Thank you!
Hi Katie! It is hard to find a good clean store-bought sprinkle! But these are really easy to make, especially if you go with the overnight no-bake option. I find myself making a custom colored batch for all sorts of things now 🙂 I hope they work perfect for your cake recipe!
how would i do a red color for christmas cookies and do they taste like spiralina and turmeric?!
No, you don’t taste the turmeric/spirulina at all, it’s such a small amount! And red is hard, it always comes out pink😬 Beet powder would be my best recommendation!
I really love this idea. My husband just made pink for my little girl who has asked for sprinkle cookies for Christmas. I only have one question, should I apply the sprinkles before I bake the cookies or after? I am scared if the sprinkles are added before they might turn brown and lose their pink color.
Hmm yes I’m afraid the coconut will get too toasted if you put them on before, but if you put them on after they might not stick😕 It may be best to frost the cookies first like this: https://www.feastingonfruit.com/almond-flour-sugar-cookies/
Thank you so much!
I’m allergic to coconut. is there anything I can replace it with?
Um you could try hemp seeds maybe! They should absorb the color the same way, but I haven’t tested it personally to say for sure 🙂
Thanks for the suggestion!
I’m so glad to find this! I needed something fun to top my favorite dairy free, egg free cupcakes.
These will be cute and colorful and perfect for that purpose🥳 Can’t wait for you to try them!
As you know, the inspiration for me to make these came from your delectable, dreamy Cosmic Brownies 🌈😍 but these sprinkles are so good that I had to drop a comment on this site just to say… GENIUS! So fun and so easy with a dehydrator too. Rest assured that the remainder of these sprinkles will find their way onto cupcakes, donuts, all manner of frostings, spoons… EVERYTHING!
★★★★★
Hehe thanks for popping in to comment on these colorful little things too💗 Great idea to speed it up with a dehydrator, I wish I still had mine sometimes. Happy weekend to you, I hope it involves something sweet and sprinkle-topped and delicious!
I just made these with my little one today. He had so much fun. Can I store these all together? Do they need to be stored separate by color?
★★★★★
YAY!! I am so happy you guys tried them🤗 And I usually store them altogether, although after a week or two I find the yellow does start to seep into the others a bit so they will retain their colors best separate!