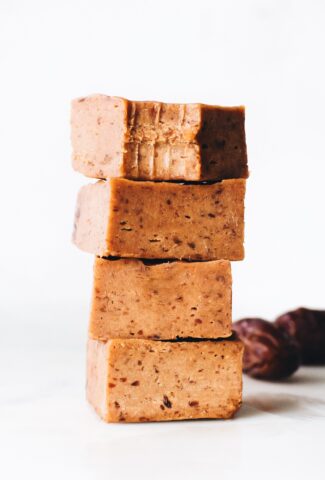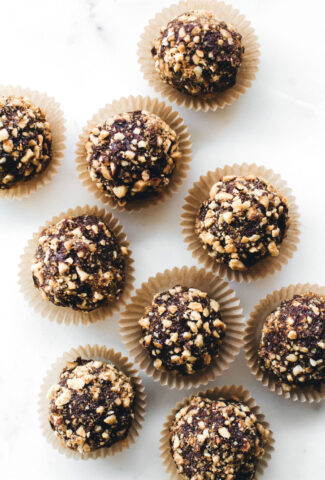
Decadent no-bake balls with a rich chocolate truffle center and crunchy peanut coating from The Vegan 8 Cookbook. Salty, sweet, and SIMPLE to make!

It’s not often I have the time or extra kitchen energy to try other blogger’s recipes. But when I do it’s usually from The Vegan 8, and it’s ALWAYS so deliciously worth putting my own recipe testing on hold for.
Brandi amazes me with what she can do with healthy, vegan, and always oil-free ingredients. And whether she knows it or not, over the many years I’ve been following her she has taught me a lot about baking that comes through in my own recipes too.
The tapioca starch + oat flour combo that I love so much? Brandi.
How to make low fat cake with applesauce that doesn’t suck? Brandi.
The magic of coconut butter in baking? Brandi.
The best vegan gingerbread cake of my life? Brandi.

Even though we disagree about most fruits (I mean who doesn’t like dates OR bananas?), our recipe styles are quite similar and there is not a single dessert she posts that I don’t immediately wish I was eating. I send my readers to her blog all the time because I know her recipes never fail, and she pulls off savory just as well as sweet – something I still cannot personally fathom. Plus she’s a wonderful human who I am grateful to have connected with through blogging.
So I guess I can forgive the whole fruit thing. And we do still agree: CHOCOLATE FOR LIFE.

All that is to say, I am so excited and honored to get to share a recipe from her new book, The Vegan 8 Cookbook, with you today.
We knew it was coming. We knew it would be beautiful and approachable and of course delicious, just like her blog. But whoa.
The photos are stunning. The selection has every meal/season/cuisine covered and then some. And the simple, 8 ingredient or less style of her blog comes through beautifully.

It’s broken down into:
- breakfast
- snacks and appetizers
- lunches
- sauces and dressings (yes, there’s a dedicated section)
- entrees
- soups and stews
- sides and dips
- and desserts!
With a pantry/equipment breakdown at the beginning and a staples section at the end. Plus every recipe includes volume and weight measurements, which I love, and nutrition stats.

Being me, I went to the dessert section first. And was greeted by the most mouthwatering chocolate cake I will be making for my next birthday. But also by these yummy and irresistibly easy Chocolate Peanut Butter Candy Bites.
Don’t think these are just another no-bake bliss ball, that word CANDY is there for a reason. They taste like a truffle meets a butterfingers candy bar meets what is this magical peanutty crunchy coating that I never want to stop licking off my fingers. They will put any candy you consumed yesterday to shame, just wait…

This book is cozy comfort food made easy and healthier than it looks in the most NOT in your face vegan/healthy/kale kinda way. If that sounds like your style, amazon prime this thing too yourself ASAP and get to baking/cooking. Find it HERE!
Print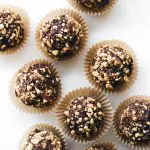
Chocolate Peanut Butter Candy Bites
- Prep Time: 20 minutes
- Cook Time: 20 minutes (chilling time)
- Total Time: 40 minutes
- Yield: 8 balls 1x
- Category: dessert
- Method: no bake
- Cuisine: american
Description
Decadent no-bake balls with a rich chocolate truffle center and crunchy peanut coating from The Vegan 8 Cookbook. Salty, sweet, and SIMPLE to make!
Ingredients
- 1/2 cup (128g) smooth peanut butter
- 3 tbsp (18g) unsweetened natural cocoa powder
- 3 tbsp (60g) pure maple syrup
- 1 tsp (5g) vanilla extract
- 1/4 tsp (2g) fine salt
- 1/2 cup (80g) roasted, salted peanuts
- 1/4 cup (40g) coconut sugar
- 3.5oz (100g) 70-72% dark chocolate chips or bar, finely chopped
Instructions
- Line a sheet pan with parchment paper. Set aside.
- Add the peanut butter, cocoa powder, maple syrup, vanilla, and sea salt to a bowl, and stir until it comes together into a thick batter and is completely smooth. Roll about a heaping tablespoon of the dough into small balls, creating 8 balls total. Place the balls on the prepared pan.
- To prepare the coating, add the roasted peanut and coconut sugar to a food processor, and process until the mixture is in very small pieces but not as superfine as a flour consistency. Add this mixture to a wide, shallow bowl. Set aside.
- Add the chopped chocolate to another small microwave-safe bowl. Melt in the microwave on HIGH for 30 seconds or in a double boiler. If microwaving, stir, and then heat in 10 to 15-second intervals until the chocolate is almost all melted. Be careful not to let it burn. Stir the chocolate until it is completely melted and smooth.
- Place 1 ball into the melted chocolate and use a fork to rotate and coat it completely. Tap the fork gently on the side of the bowl, letting the excises chocolate drip off. Immediately place the ball into the peanut coating mixture and rotate it multiple times with at the fork until coated well. Place the ball back on the pan and repeat with the remaining balls.
- Place the pan in the fridge to set for about 20 minutes. Store the ball sin the fridge to retain their shape. They can be set out at room temperature after they’re fully set for parties, but they will become softer and less crispy as time passes.
Nutrition
- Serving Size: 1 ball
- Calories: 260
- Sugar: 19g
- Sodium: 209mg
- Fat: 23.2g
- Carbohydrates: 26.3g
- Fiber: 4g
- Protein: 8.7g
Keywords: vegan, gluten-free, no bake, easy, dessert, snack
CLICK BELOW TO PIN