Oatmeal with no oats! With a cereal-like texture, this easy low fat raw cereal bowl will remind you of your favorite breakfast but is made with only fruit!
 Has someone been messing with a time turner around here? Because I feel like I just stepped back a couple of years into my blogging past with this recipe. Raw, totally fruity, just a handful of ingredients–it’s like an old school Feasting on Fruit recipe.

With all the baked this and cooked that I post much of the time you may find it hard to believe that I actually started this blog with the intent of doing entirely low fat RAW vegan recipes. But stuff happened, baked requests came, and muffins are just so dang good! I have zero regrets for bringing cooked vegan goodness into the picture, but it’s fun to throw it back to the old, extra fruity days sometimes.


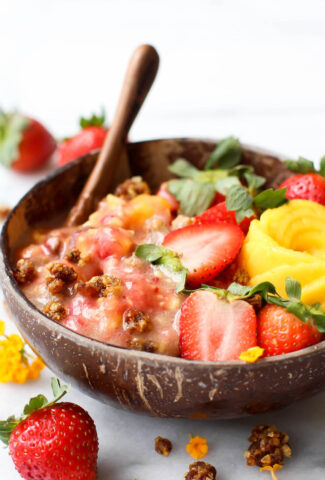
Mango Strawberry Fruity Raw Cereal
I received the most specific recipe request a few weeks ago: HCLF raw vegan mango strawberry oatmeal. My first thought was “But I don’t really do raw recipes anymore.” My second thought was “Mmmm that sounds good!”
It took my brain a little while to work out how to make it happen. How to transform plain ole fruit into the chunky-meets-creamy texture of oatmeal.
But you know that point when you are making nicecream in a food processor and it sort of resembles dippin’ dots? And if you hadn’t made it thousands of time before, you’d be wondering how on earth will those fruity pebbles turn into creamy bliss?
Well STOP! Stop right there! Those fruity pebbles are exactly what you need for raw vegan fruity cereal. The texture is perfect. So perfect someone should name a cereal after it or something…?


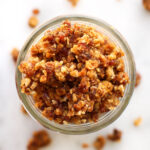
Add in some Grain-Free Rawnola for extra texture and sweetness. Pour on some banana milk for the creamy part of the oatmeal equation. Top with fruit and maybe even a mango rose if you are feeling fancy. And you have a pretty spectacular raw, vegan, not-a-smoothie breakfast bowl!
>>> Click Below To Pin <<<


Mango Strawberry Fruity Raw Cereal
- Prep Time: 15 minutes
- Total Time: 15 minutes
- Yield: 2 servings 1x
Ingredients
Cereal
- 1 1/2 cup frozen mango
- 1 1/2 cup frozen strawberries
- 1/2 cup Grain-Free Rawnola
Banana Milk
- 2 ripe bananas
- 3/4–1 cup water
Instructions
- In a food processor, combine the frozen mango and frozen strawberries. Process briefly to create pebble-sized pieces. Do not over-process or you will have nicecream.
- Transfer to a bowl and place in the freezer.
- Blend the banana and water to make the banana milk. Adjust to your desired consistency with more/less water.
- Remove the cereal from the freezer, stir in the rawnola, pour on the milk, and enjoy!


 | Vegan, Raw, Nut-Free")
 | Vegan, Raw, Nut-Free")
 | Vegan, Raw, Nut-Free")
 | Vegan, Raw, Nut-Free")
 | Vegan, Raw, Nut-Free")
 | Vegan, Raw, Nut-Free")
 | Vegan, Raw, Nut-Free")
 | Vegan, Raw, Nut-Free")
 | Vegan, Raw, Nut-Free")
 | Vegan, Raw, Nut-Free")
 | Vegan, Raw, Nut-Free")
 | Vegan, Raw, Nut-Free")
 | Vegan, Raw, Nut-Free")


 Snack? Dessert? Maybe even an on-the-go breakfast?