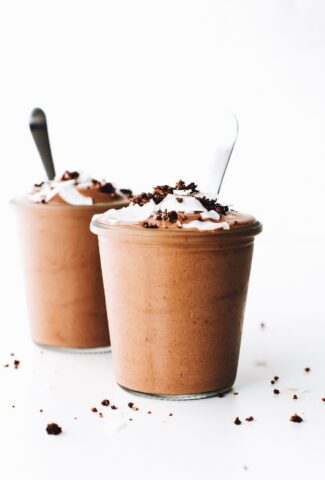
Creamy Chocolate Hazelnut Shake! A lower fruit smoothie-ish treat with hazelnuts, cacao, chia seeds, and dates. Or add ice for a healthy dairy-free frosty!
")
Hi, hello. Popping in with a quick, mid-week dose of chocolate for you.
I shared an impromptu chocolate smoothie on Instagram last week, but it was too good not to remake for myself every day since post on the blog. So here we are.
We could call this a smoothie – it’s made in the blender, it contains fruit. But it’s really not a smoothie. There are no bananas involved (although you could add one). There is no heaping handful of greens shoved into the blender (although you could add them). There is no sneaky frozen cauliflower to make it veggie-thick (although you could add that too).
Luckily this beverage is much easier to drink than it is to categorize. MUCH. Like you may make a double batch to share with a beloved friend, and then find yourself slurping the last sip straw-in-blender style before you even know what happened. Sorry beloved friend.
")
")
If you make the non-frosty version, expect an ultra creamy, nutella tasting, almost pudding, definitely need a spoon experience.
If you make the frosty version, then you are smart and you just found your new favorite 2 minute summertime snack. Or dessert.
")
So what’s in this banana-less chocolate beauty?
- Hazelnuts. Just the whole toasty little nuts, no soaking required if you have a high speed blender. And yes, other nuts or even hemps seeds will work (I think walnuts or cashews would be really yummy too!)
- Non-dairy milk.
- Chia seeds.
- Dates. Or a little bit of maple syrup or honey. Or whatever sweetener you like.
- Cacao powder (or cocoa).
- Sea salt!
- Vanilla. The powder would be extra good, but extract is okay too.
- (Optional) ice.
It’s not that I don’t love bananas, I just don’t love (or feel awesome eating) lots of bananas. But I do love lots of smoothies, so finding banana-free alternatives is one of my current life’s missions.
If you really love those bananas, omit the dates and swap the ice for frozen banana.
If you are looking for lower sugar smoothies, swap the dates for stevia or whatever sweetener you like – hello low carb smoothie.
")
Shake. Dessert smoothie. Potentially a frosty. Chocolatey thing you need in your life.
This recipe is all of the above.
Chocolate Hazelnut Shake (or Frosty!)
- Prep Time: 5 minutes
- Total Time: 5 minutes
- Yield: 1 serving 1x
- Category: beverage
- Method: blended
- Cuisine: american
Description
Creamy Chocolate Hazelnut Shake! A lower fruit smoothie-ish treat with hazelnuts, cacao, chia seeds, and dates. Or add ice for a healthy dairy-free frosty!
Ingredients
- 1/4 cup (30g) toasted hazelnuts*
- 1 cup (240g) non-dairy milk
- 2 tbsp cacao powder (or cocoa powder)
- 1 tbsp chia seeds
- 2 pitted (40g) medjool dates**
- 1 tsp vanilla extract
- Pinch of salt
Make it a frosty: add 1 cup ice OR a frozen banana OR 1/2-1 cup frozen cauliflower
Instructions
- Combine all the ingredients in a blender (if you don’t have a powerful blender, soak the nuts beforehand).
- Blend on high speed until smooth and creamy. About 30 seconds.
- Add ice if using. Blend again briefly.
- Top with coconut whipped cream, chopped hazelnuts, and dark chocolate. Enjoy!
Notes
*You can use other nuts (cashews or walnuts would be yummy!) or hemp seeds for a nut-free option. **Or 1 tbsp sweetener of choice (honey, maple syrup, coconut nectar, etc.) Or use stevia or another sugar-free sweetener instead for a low carb/sugar option.
Nutrition
- Serving Size: 1 shake
- Calories: 384
- Sugar: 14g
- Fat: 27g
- Saturated Fat: 2g
- Carbohydrates: 32g
- Fiber: 10g
- Protein: 10g
Keywords: vegan, chocolate, smoothie, shake, easy, nutella
CLICK BELOW TO PIN
")


")
")
")
")
")
")
")


")
")
")
")
")
")

")
