Sweet, salty, scoop-able peanut perfection with TONS of chocolate cereal chunks and only 5 ingredients. No banana, coconut, or ice cream machine required!
")
My freezer did not get a single day off last week. It was ice cream every damn day – sometimes twice. Churned and no-churned. Banana and coconut and some none of the above batches too. For snacks and desserts and dinner once…or maybe more than once.
")
Because why have dessert after dinner when you can just have dessert for dinner?
Riddle me that!
If it’s homemade, healthy-ish, naturally-sweetened and mostly made of mostly healthy stuff I have zero qualms calling ice cream dinner. If it happens to be veggie-green too, then let’s just eat it for any and every meal already.
And I’m not the only one who qualifies ice cream as a healthy meal, my friend Arman agrees. Workout fuel in ice cream form anyone? Tried it, devoured it, went for a ten mile run afterwards HA! I don’t run. But I do highly recommend the date-sweetened version with extra sprinkles.
")
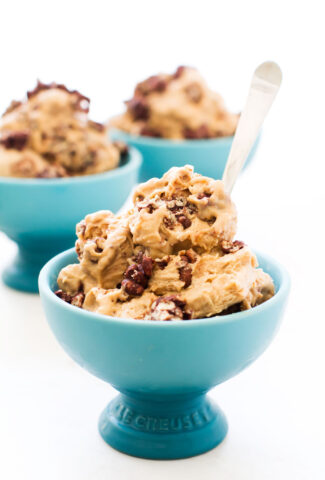
I’ll step down from my ice-cream-is-practically-a-health-food soap box now though so we can discuss all the nutty cluster-crunchy ice cream hodgepodge happening in these beautiful blue bowls. Because I know that is one long honking recipe name up there that you probably read in like 0.7 seconds before scrolling right on by to the photos, so I think it’s best we break it down to fully get the yummy picture.
")
The ice cream. When I set out on this ice cream-making mission I didn’t have a particular flavor in mind, I just knew that I wanted it to be both banana and coconut free. After running through approximately a bazillion ideas in my mind and giving the Ben & Jerry’s website a thorough scroll, I finally landed on peanut butter for a mix of color and texture and utter deliciousness reasons.
This ice cream is date-sweetened, but the dates really do more than just sweeten in this no-churn recipe. They are quite good at giant-rock-of-ice-cream prevention too since dates/date paste doesn’t freeze completely solid. So for creaminess and scoop-ability without an ice cream maker, they are an awesome ice cream addition. And the fact that they take care of the whole natural sugar thing too is pretty sweet.
Natural Delights is my go-to for Medjool dates, my fridge is just about as packed with them as my freezer is with half-eaten ice cream experiments. And the pitted ones make this ice cream blending process extra lightening quick and easy.
")
Without coconut cream, the recipe needed some other form of healthy plant fat to keep the texture rich and luscious. Hello peanut butter, thank you for answering the creamy ingredient call.
An unsweetened and oil-free natural peanut butter is always my top choice, but any kind will work. The less runny/soupy it is, the thicker and creamier your ice cream base will be. And you could certainly use other nut or seed butters as well, although it will throw off the Reese’s-inspired flavor profile of this recipe a bit.
The last ingredient in the ice cream base is non-dairy milk. I used cashew milk, the kind in a carton. Almond will work too, or really any kind of non-dairy milk you like and have on hand. Homemade would be awesome, but even I am too lazy for that 95% of the time.
")
The clusters. My personal favorite part, feel free to skip the rest of the recipe entirely. They are just a simple melted chocolate + cereal situation, but man is it 10 times more magical in your mouth than it sounds in writing. Crunch bars have always been one of my favorite chocolate candies though, so perhaps I am biased.
I used my favorite One Degree Organics brown rice cereal and melted semi-sweet mini chips which made for the perfect sweet snappy cereal clusters for snacking while the ice cream is freezing mixing into the peanut butter ice cream as a crunch-meets-creamy contrast.
To create the clusters, simply mix together the cereal and melted chocolate until evenly coated and then plop onto a pan and chill or freeze. Once they are firm enough to break apart without making your fingers too much of a melty-chocolate mess, you can crumble them into the peanut butter base and stir it all up so there are plenty of clusters in every single scoop.
")
Freeze overnight. Thaw for 10-15 minutes before scooping. Serve it up with extra clusters on top that you didn’t eat all of from the day before. And then I think you can take it from there.
So it’s basically a collaboration between Reese’s, a rice crispy treat, and ice cream. And honestly those three should work together more often because they make crazy-good team!
But before you start melting your chocolate and checking your PB supply levels, I need to tell you one more thing. And if you love ice cream and pretty things, then trust me you are going to want to hear it…
")
These BOWLS. The cute little caribbean blue ice cream bowls you see showing off all that cluster-filled peanut butter perfection are Le Creuset’s summer-snazzy ice cream bowls, and they are probably the cutest thing I’ve ever eaten peanut butter anything out of. Not to mention perfect for all other flavors of ice cream too.
A little roomy around the edges to catch any toppings that may topple down from the scoop peaks. Classy stemmed silhouette that allows for a) a handle that won’t make your hand chilly if you happen to be in transit while eating or b) ice cream an extra 4 inches closer to your face than it would be in a plain bowl. Either way it’s a win. And hey, I won’t even tell if you eat non-ice cream things out of them as well.
If you adore them as much as I do, then hop on over to Instagram ASAP and enter my giveaway to win a set for yourself in the color of your choosing. The giveaway is US only (apologies to my international friends!) and only open until Wednesday at midnight so get on it -> HERE
")
Peanut Butter Chocolate Crunch Cluster Ice Cream
- Yield: 4 people 1x
Description
Sweet, salty, scoop-able peanut perfection with TONS of chocolate cereal chunks and only 5 ingredients. No banana, coconut, or ice cream machine required!
Ingredients
Chocolate Crunch Clusters
- 2 cups crispy rice cereal
- 3/4 cup chocolate chips
Peanut Butter Ice Cream
- 2 cups non-dairy milk ((cashew used))
- 1 cup peanut butter
- 1 cup Medjool dates, pitted ((about 12))
Instructions
- For the clusters, melt the chocolate chips and mix with the crispy rice cereal until evenly coated. Drop small spoonfuls on a pan lined with wax paper and refrigerate or freeze until firm.
- For the ice cream, blend all the ingredients until smooth and creamy.
- Pour half of the peanut butter base into a loaf pan. Sprinkle in a layer of the clusters.
- Top with the rest of the ice cream and more chunks. Stir to evenly distribute.
- Freeze overnight.
- Remove from the freezer 10-15 minutes before scooping and serving. Enjoy!
Or if banana ice cream is more your style, try this one >>> Peanut Butter Chunk Nice Cream
Pin It
")

")
")
")
")
")
")
")
")
")
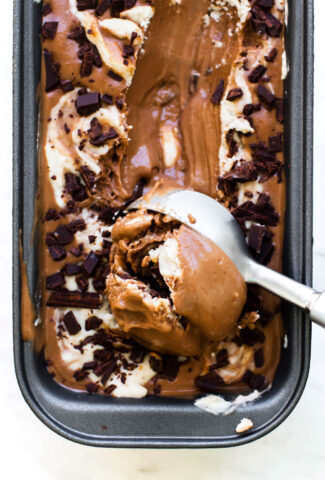
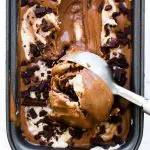
") A.k.a. mocha dark chocolate chunk with a creamy vanilla swirl ice cream.
A.k.a. mocha dark chocolate chunk with a creamy vanilla swirl ice cream.")
")
")
")
")
")
")