 If I said this was easy to make I’d be lying.
If I said this was not epically delicious I’d be lying again.
It requires multiple steps, multiple bowls, lots of stacking, and lots of finger licking. But it is worth it. SO worth it.


Before we even get to the sweet stuff sandwiched in between, let’s talk about this cake. Other than for color, the cake really doesn’t even need the frosting. There are already a few chocolate cake recipes on FF…
– The adorable Everything-Free Chocolate Cupcakes
– The strawberry-concealing Chocolate Lava Loaf Cake
– The elegant 5-Ingredient Flourless Dark Chocolate Cake
But this one is different. It is richer and lighter. It is so close to the classic. Even my mom, the toughest cake critic around, said it reminded her of boxed Devil’s Food cake (the gold standard of course ?).
What’s different? This recipe is sweetened with a combo of dates and coconut sugar. I think that is the secret. I love my fruit-sweetened cupcakes, always will, but they will never be as light as a sugar-sweetened recipe. But a sugar-sweetened recipe will never be as moist as a date-sweetened one. So apparently, just like life, cake-sweetening is all about balance too.
Oh, and it has a lot more cacao powder than the Everything-Free Cupcakes, so extra chocolatey! It’s still oil-free, gluten-free, and vegan, of course.

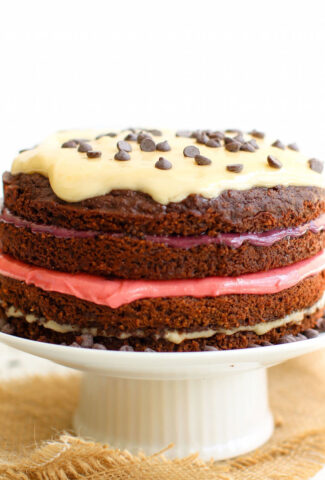
 The frosting is just fruity fun! Made vibrant with freeze-dried fruit. Made creamy with So Delicious Unsweetened Cultured Coconut Milk. Made sweet with blender-blitzed or store-bought vegan powdered sugar.
It may have a little more non-fruit sweetening than most of FF recipes, but when you are trying to create a stunning something for the So Delicious and Go Dairy Free Snackable Recipe Contest, you pull out all the sweet stops!
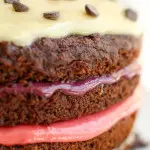
Creating those colors…
– Blueberries = purple
– Strawberries or raspberries = pink
– Peaches or mangoes or pineapples = yellow
– Spirulina DOES NOT = green! It = a monstrous color in between green and cement…don’t go there.
As I said, there are many steps, so here’s a video:

Fruit-Frosted Chocolate Layer Cake
- Prep Time: 45 minutes
- Cook Time: 25 minutes
- Total Time: 70 minutes
- Yield: 6 1x
Ingredients
- CAKE
- 1 1/2 cup oat flour
- 1 1/2 cup So Delicious Unsweetened Almond Milk
- 1/2 cup coconut sugar
- 1/2 cup cacao powder (or cocoa powder)
- 1 1/2 tbsp baking powder
- 12 pitted medjool dates
- 1 tsp vanilla extract
- FROSTING
- 6 cups powdered sugar (store-bought or homemade)
- 1/2 cup So Delicious Unsweetened Vanilla Cultured Coconut Milk
- 1/2 cup freeze dried strawberries
- 1/2 cup freeze dried blueberries
- 1/2 cup freeze dried peaches/mangos/pineapple
Instructions
- FOR THE CAKE: Preheat the oven to 325F.
- Blend the dates, cacao powder, coconut sugar, almond milk, and vanilla extract on high until smooth.
- In a large mixing bowl, lightly whisk together the oat flour and baking powder.
- Add the wet to the dry, and mix to combine.
- Divide the batter between two 6 inch round cake pans that are lined or lightly oiled.
- Bake for 25-27 minutes at 325F. The center should bounce back if lightly pressed when the cakes are done.
- Let the cakes cool completely. Slice each cake horizontally into two thin layers. Set aside.
- FOR THE FROSTING:
- With a hand mixer, whip together the Cultured Coconut Milk and powdered sugar until smoothand lump-free. Adjust the amount of sugar and/or yogurt as necessary to achieve a stiff but spreadable consistency.
- Using 3 bowls, divide the frosting into 1/4, 1/4, and 1/2 (the 1/2 color will be the repeating color).
- Blend each of the freeze dried fruits separately in a VERY dry blender or coffee grinder until they become powder. Start with the yellow, then the red, then the purple (lightest to darkest), wiping out the blender with a dry paper towel in between each color.
- Add the fruit powders to the divided frostings, whisking each with the hand mixer to thoroughly blend the color in. You may not need all the powder, so adjust the colors to your liking.
- TO ASSEMBLE: On a plate or cake round, start with your first layer of cake. Gently spread on your repeating frosting color (I used yellow) with a spatula or dull knife. Be careful not to get crumbs in your frosting. Don’t spread the frosting all the way to the edge as the weight of the next layer will push it out further.
- Repeat with the remaining layers. Finish with a sprinkling of chocolate chips, sprinkles, or chocolate shavings.
- Serve immediately or refrigerate to prevent the frosting from smushing (very technical word) out the sides.